software
🧭 Git Worktree 使用笔记
一、什么是 git worktree
git worktree 允许在同一个 Git
仓库中创建多个独立的工作目录(工作树),每个目录可以检出不同的分支或提交点。\
它让开发者能够在多个分支之间并行工作,而不必频繁切换分支或使用 stash。
MySQL 监控指标
1.opened_table_definitions
1.查询
MySQL admin@192.168.31.180:(none)> SHOW GLOBAL STATUS LIKE '%Table_definition%';
+--------------------------+-------+
| Variable_name            | Value |
+--------------------------+-------+
| Open_table_definitions   | 226   |
| Opened_table_definitions | 299   |
+--------------------------+-------+

2 rows in set
Time: 0.179s
k8s-相关问题
1.kubernetes 创建ServiceAccount 后没有生成对应的secret
从 1.24 开始就不会自动生成 secret 了,chanagelog 在这里.
内容如下 LegacyServiceAccountTokenNoAutoGeneration 功能门是测试版,默认启用。启用后,不再为每个 ServiceAccount 自动生成包含服务帐户令牌的 Secret API 对象。使用 TokenRequest API 获取服务帐户令牌,或者如果需要未过期的令牌,请按照本指南为令牌控制器创建一个 Secret API 对象以填充服务帐户令牌
pr: https://github.com/kubernetes/kubernetes/pull/108309
参考:
[1].https://www.soulchild.cn/post/2945/
git modules 相关命令
1.删除子模块文件夹
echo -e "backend\ndbinit\nfrontend\ndocs\nreleases\ngreatdas" |  xargs -t -I {} git rm --cached {}
echo -e "backend\ndbinit\nfrontend\ndocs\nreleases\ngreatdas" |  xargs -t -I {}  rm -rf {}
2. 删除 .gitmodules 文件中相关子模块的信息,类似于:
3.删除 .git/config 中相关子模块信息,类似于:
4.删除 .git 文件夹中的相关子模块文件
Mac 自带翻译由于代理导致不可用问题
Mac的自带翻译由于会检测是否存在代理行为会导致不可用,需要进行额外配置
1.在Clash for Windows 中的Settings -> System Proxy 中进行额外配置即可

点击Edit 进行配置,增加以下两行内容
增加后内容如下
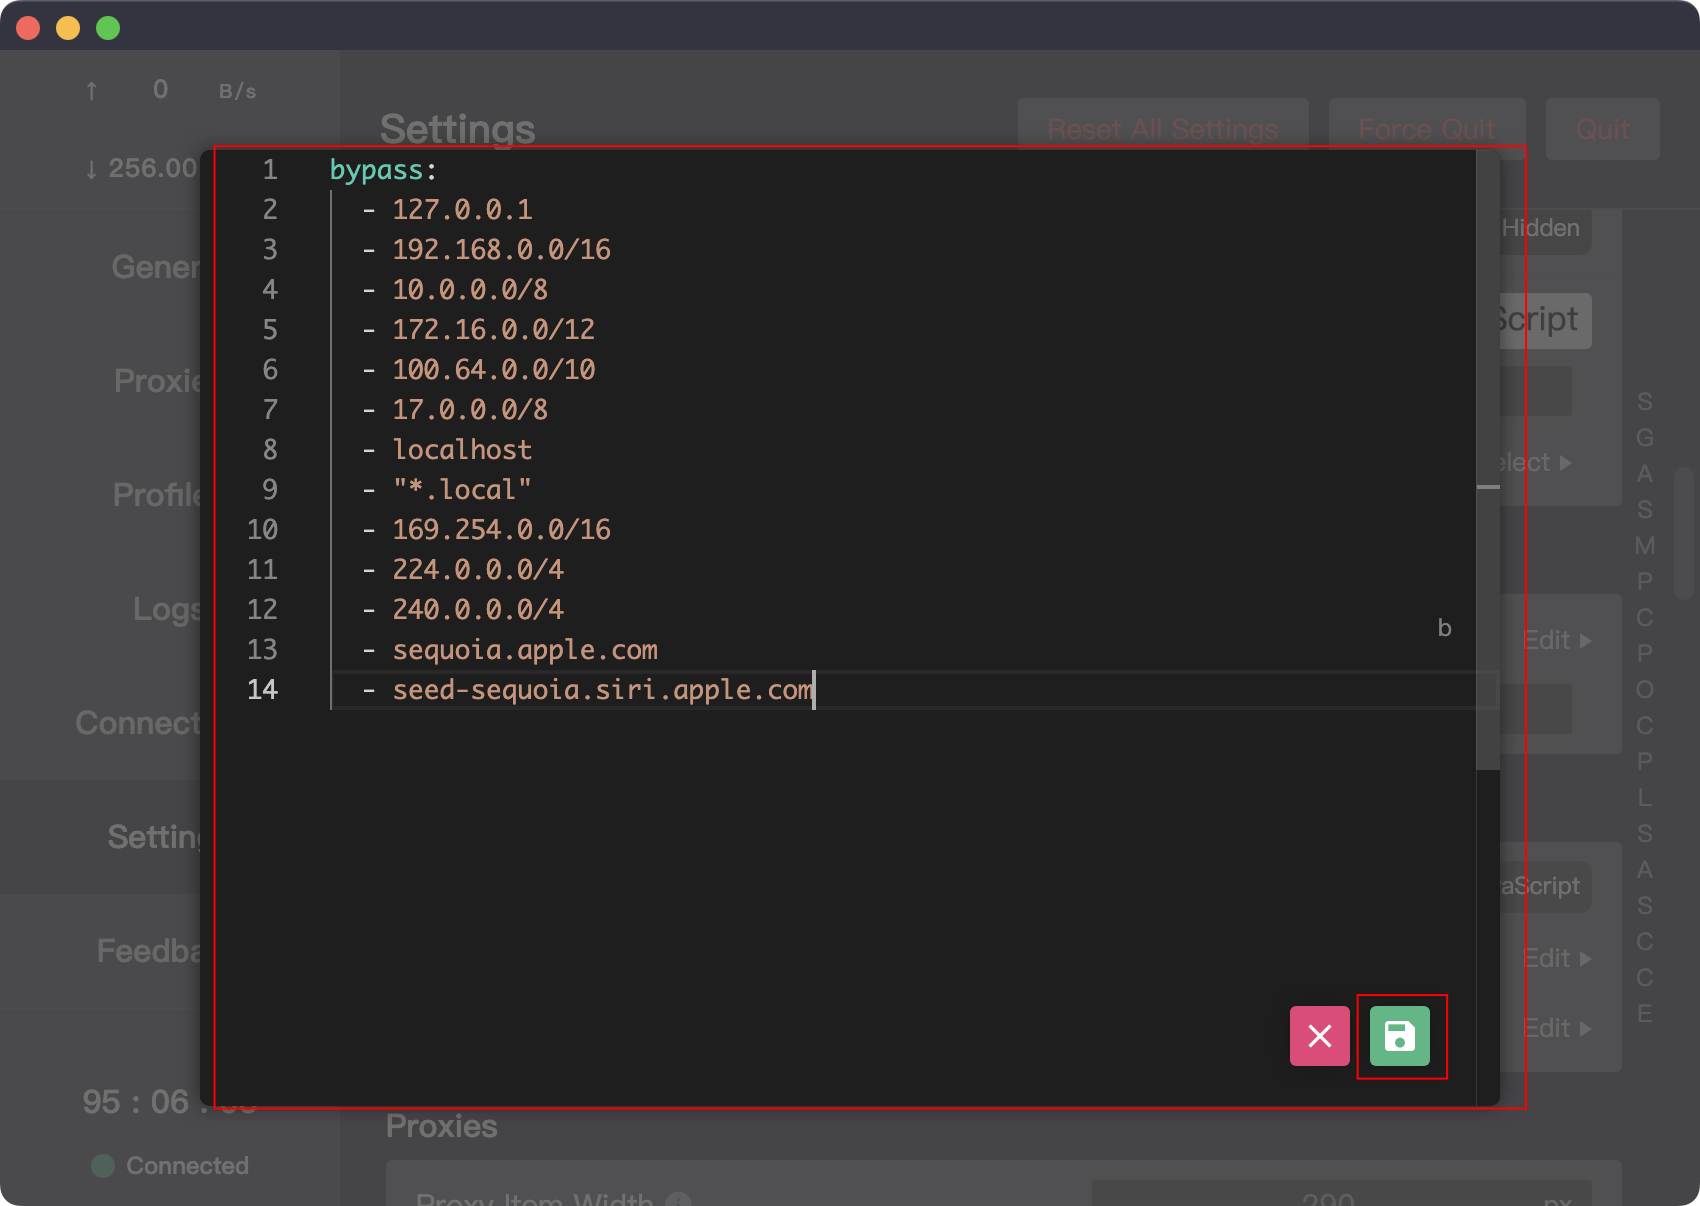
点击保存,使得变更生效
参考:
[1].https://zhuanlan.zhihu.com/p/581119370
Kubernetes学习笔记
1.云原生概念
2.容器基本概念
3.Kubernetes基本概念
- 安装MiniKube https://developer.aliyun.com/article/221687
- 安装kubectl [https://kubernetes.io/zh/docs/tasks/tools/install-kubectl-linux/]
4.Pod
Pod 实现机制:
-
共享网络
-
共享存储
容器设计模式 SideCar
- 1.Init Container
- 2.Proxy Container
- 3.Adapter Container
总结:
- Pod 是Kubernetes 实现 容器设计模式的核心机制
- 容器设计模式是Google Borg 的大规模容器集群管理最佳实践
- 也是Kubernetes 进行复杂应用编排的基础依赖之一
- 所有设计模式的本质都是解耦和重用
Chrome Network 面板使用技巧
Chrome Network 面板构成
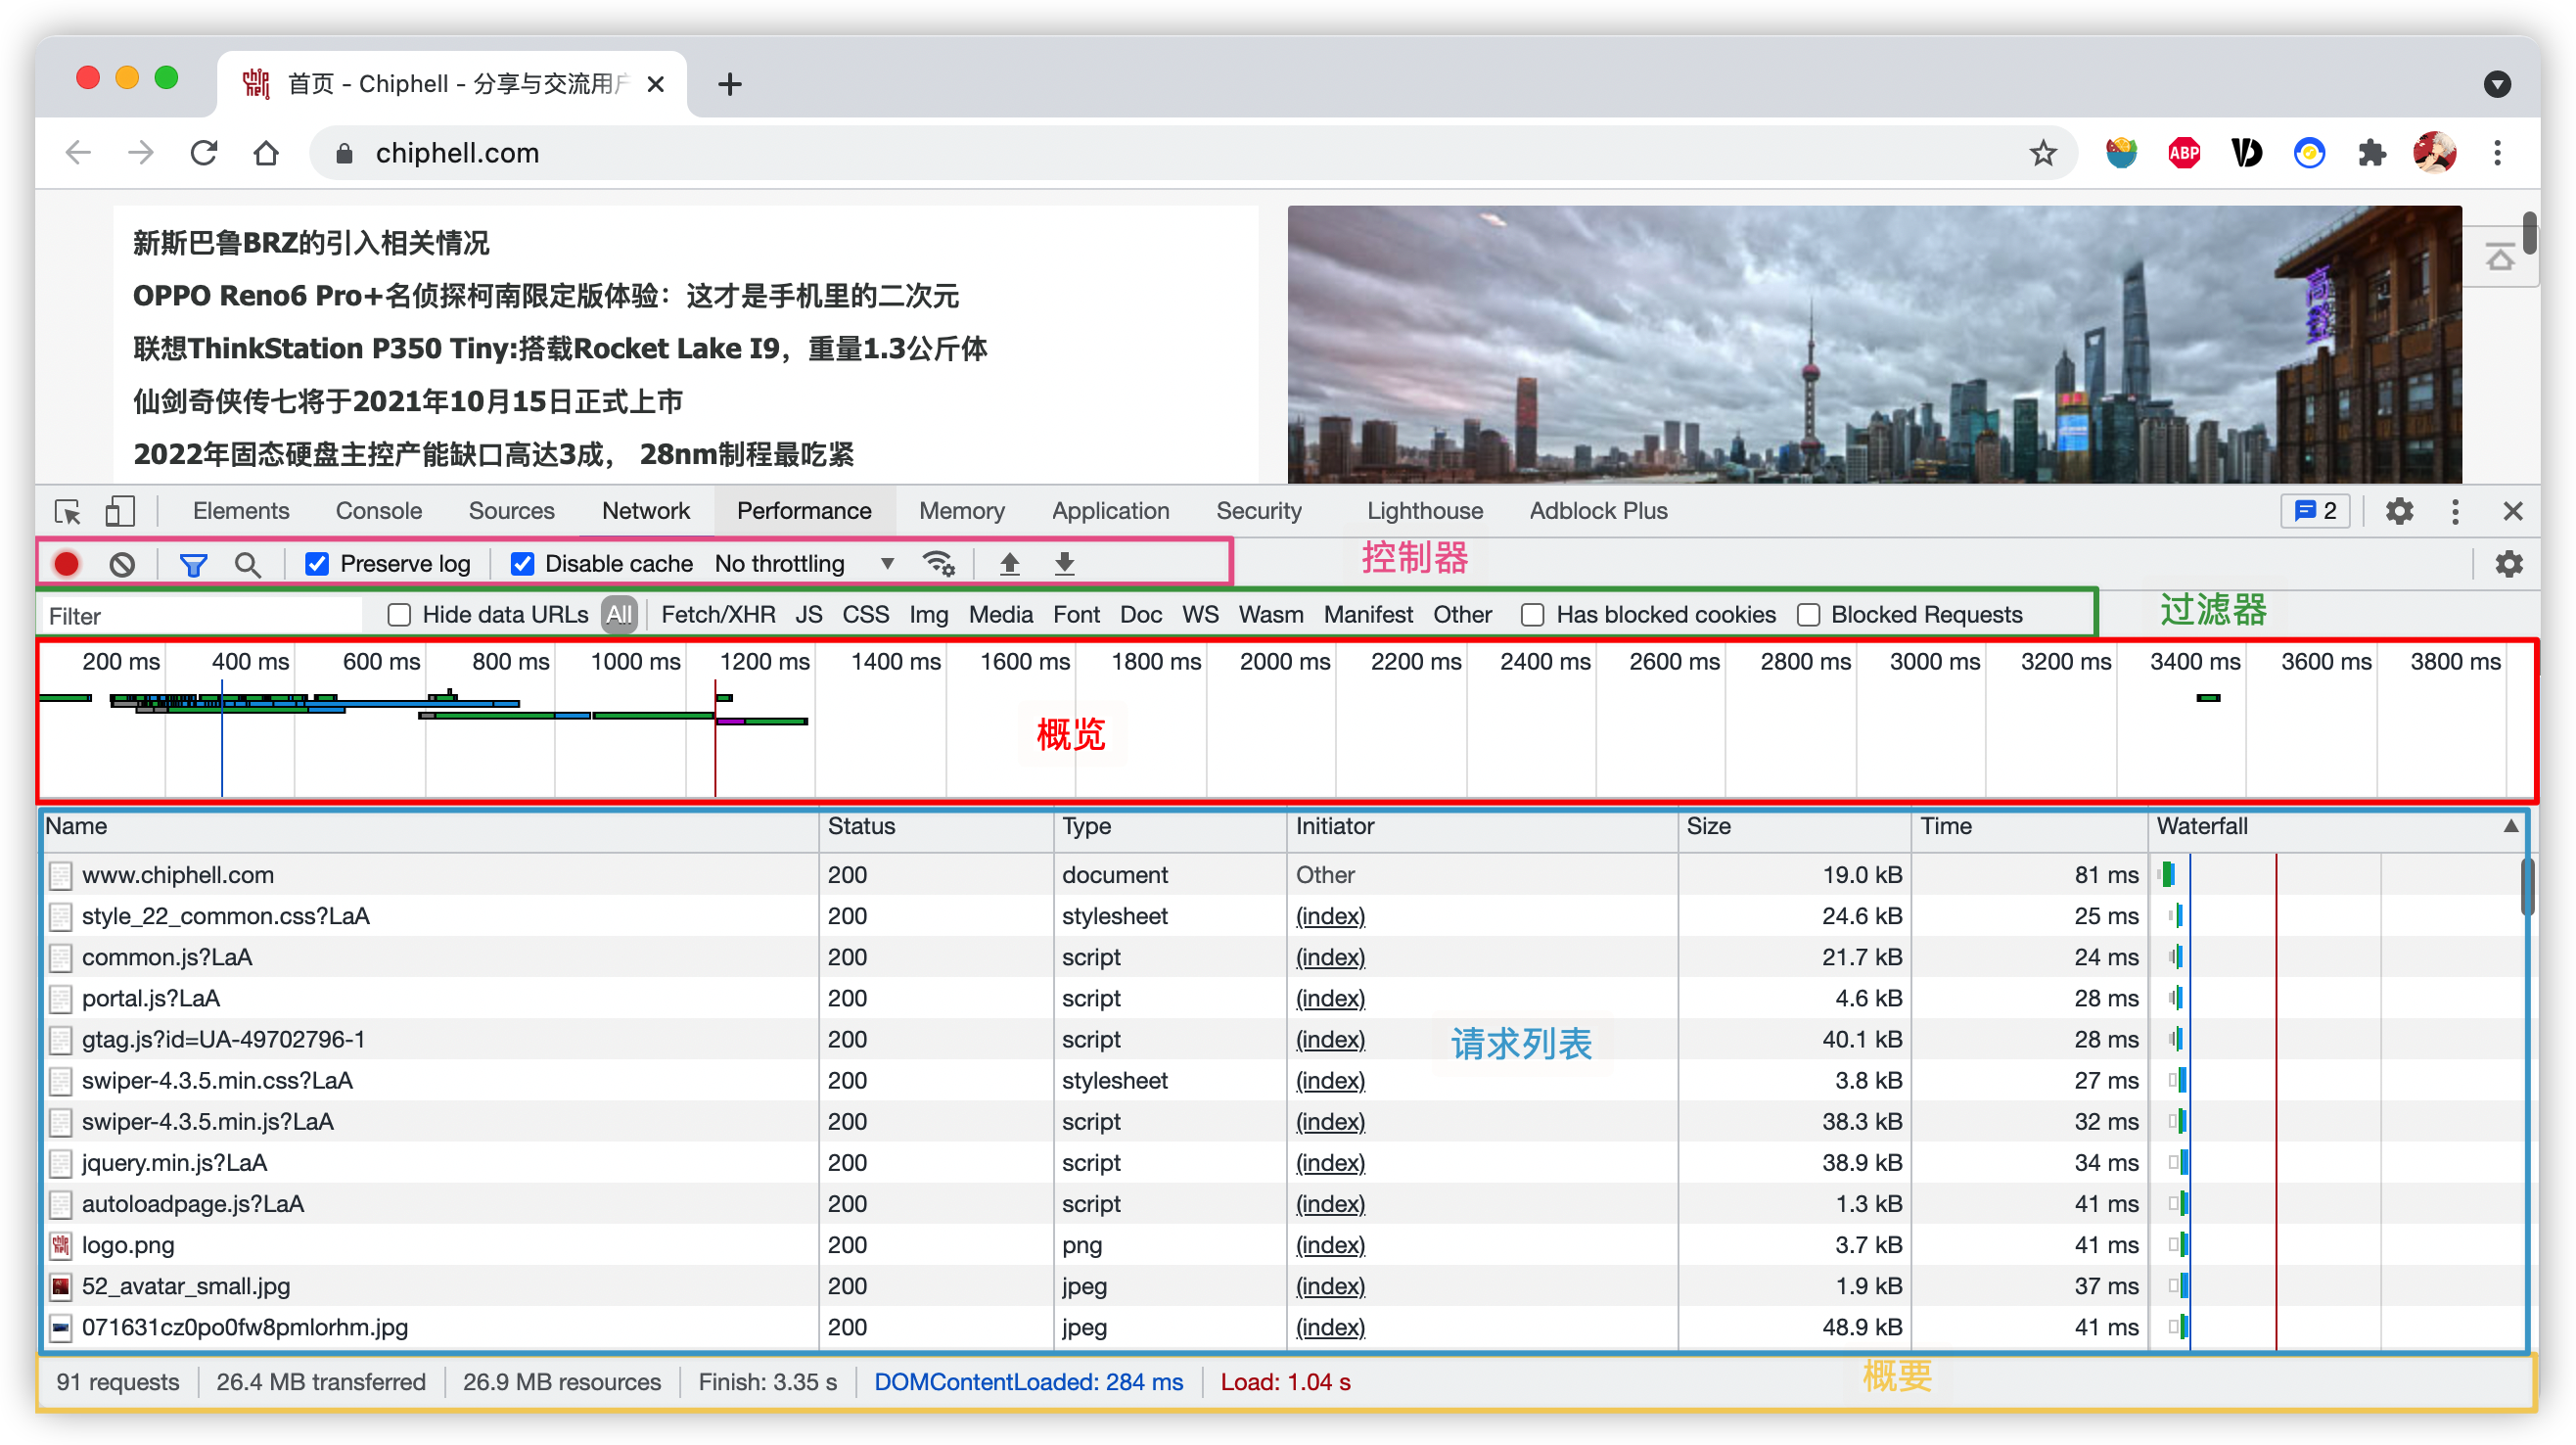
-
控制器, 控制外观与功能
-
过滤器,过滤请求资源 (Command键或者Ctrl键可以选中多个过滤器)
- 概览,显示HTTP请求
- 请求列表,时间排序(默认),显示列可选
- 概要,请求总数,请求数据量,请求资源耗时
路由器AC,AP 分别是指什么?
AP 是无线接入点(Wireless AccessPoint),负责释放无线信号,转发无线数据的作用。
In computer networking, a wireless access point (WAP), or more generally just access point (AP), is a networking hardware device that allows other Wi-Fi devices to connect to a wired network. As a standalone device, the AP may have a wired connection to a router, but, in a wireless router, it can also be an integral component of the router itself. An AP is differentiated from a hotspot which is a physical location where Wi-Fi access is available.
https://en.wikipedia.org/wiki/Wireless_access_point
AC是无线控制器(Wireless AccessPoint Controller),负责控制AP的所有设置.
一致hash 算法
普通hash算法可以对请求和服务器进行映射,达到降低服务器负载的作用.但是普通hash 算法在增加或者删除一个节点后,需要对大部分的节点进行重新映射,避免来自同一请求分布在不同的服务器上.
通过使用一致hash可以在增加或者删除节点时只更新部分映射,避免服务器长时间不可用的状态.
一致性hash算法将整个hash值空间映射为一个虚拟的圆环,整个hash 空间的取值范围为0-2^32 -1.整个空间按照顺时针顺序分布.
一致hash 将每个对象映射到圆环上的一个点,系统再将可用的节点机器映射到圆环的不同位置.查找某个对象对应的机器时,先通过一致hash算法查找对象对应圆环的位置,沿着圆环边上查找直到遇到某个节点机器,这台机器即为保存对象的位置.
当删除一个节点时,这台节点上的所有值都要移动到下一个节点. 添加一台机器到圆环边上某个点时,这个点的下一台机器需要将这个节点之前对应对象移动的新机器上.更改对象在节点机器上的分布可以通过调整节点机器的位置来实现
针对基础一致性 hash 的缺点一种改进算法是引入虚节点(virtual node)的概念。这个本质的改动:值域不再由物理节点划分,而是由固定的虚拟节点划分,这样值域的不均衡就不存在了。
[参考资料]
[1].https://zh.wikipedia.org/wiki/%E4%B8%80%E8%87%B4%E5%93%88%E5%B8%8C
[2].https://liqingqiya.github.io/hash/%E4%B8%80%E8%87%B4%E6%80%A7%E5%93%88%E5%B8%8C/%E7%AE%97%E6%B3%95/%E5%88%86%E5%B8%83%E5%BC%8F/2020/05/11/dht-hash.html
[3].https://www.toptal.com/big-data/consistent-hashing
Gossip 协议
Gossip 有两种类型:
Anti-Entropy (反煽): 以固定概率传播所有数据
Rumor-Mongering (谣言传播):仅传播新到达的数据
[参考资料]
[1].https://zhuanlan.zhihu.com/p/41228196
[2].https://hyperledger-fabric.readthedocs.io/zh_CN/release-2.2/gossip.html
[3].https://en.wikipedia.org/wiki/Gossip_protocol
commit 的sha值是如何计算的
[1].https://jingsam.github.io/2018/06/09/git-hash.html
0.使用git show 查看commit相关信息
commit bfe4078b84eec85c1cafdb0a26f3fd93b581727e (HEAD -> master)
Author: root <root@hideto>
Date:   Thu Oct 22 10:53:28 2020 +0800

    init commit

diff --git a/1.txt b/1.txt
new file mode 100644
index 0000000..ce01362
--- /dev/null
+++ b/1.txt
@@ -0,0 +1 @@
+hello
在上面的输出中 index其实就是file_sha
filebeat 相关问题清单
1.日志文件是如何被发现又是如何被采集的?
根据配置获取匹配的日志文件,采用linux glob的规则进行匹配。然后会经过复杂的过滤,可以配置exclude_files忽略文件,还可以配置ignore_older 文件修改时间超过设定值的也不会被匹配。 对于文件进行处理,获取文件的状态,同时在已经存在的状态进行对比,如果相同就不会开启新的协程,如果是新的状态就开启一个新的协程。每个input 对象创建时会从register中读取文件状态(offset),对于每一个匹配到的文件都会开启一个新的harvester进行读取。每个harvester都有一个相对应的goroutine
Filebeat 使用
1.将filebeat 多行日志合并
.使用filebeat 将多行日志合并为es 的一个doc,默认情况下,filebeat 会将每一个的日志文件作为es 的一个doc 进行输入,要想将多行日志聚合在一起,需要配置以下几个参数,分别是
MySQL查询性能优化
1.查询慢的原因
1.1查询的生命周期
查询的生命周期大致可以按照顺序来看
从客户端 --> 到服务器 --> 然后再服务器上进行解析 --> 生成执行计划 --> 执行 ---> 返回结果给客户端
其中执行 是整个生命周期中最重要的阶段,因为这执行这个阶段 有着大量为了检索数据到存储引擎的调用以及调用后的数据处理,包括排序、分组等。
查询会在不同的地方产生时间消耗,包括网络,CPU计算,生成统计信息和执行计划,锁等待(互斥等待) 等操作,特别是向底层存储引擎检索数据的调用操作,这些操作需要在内存操作、CPU操作和内存不足时导致等待I/O操作上消耗时间。如果存储引擎不同,可能会产生大量的上下文切换以及系统调用。
SQL 中exists 与in 的区别
select * from A where id in (select id from B);

select * from A where exists (select 1 from B where A.id=B.id);
对于以上两种情况,in是在内存里遍历比较,而exists需要查询数据库,所以当B表数据量较大时,exists效率优于in。
Ubuntu 配置远程连接
1.更换官方默认源
ubuntu 16.04 配置如下
deb http://mirrors.aliyun.com/ubuntu/ xenial main
deb-src http://mirrors.aliyun.com/ubuntu/ xenial main

deb http://mirrors.aliyun.com/ubuntu/ xenial-updates main
deb-src http://mirrors.aliyun.com/ubuntu/ xenial-updates main

deb http://mirrors.aliyun.com/ubuntu/ xenial universe
deb-src http://mirrors.aliyun.com/ubuntu/ xenial universe
deb http://mirrors.aliyun.com/ubuntu/ xenial-updates universe
deb-src http://mirrors.aliyun.com/ubuntu/ xenial-updates universe

deb http://mirrors.aliyun.com/ubuntu/ xenial-security main
deb-src http://mirrors.aliyun.com/ubuntu/ xenial-security main
deb http://mirrors.aliyun.com/ubuntu/ xenial-security universe
deb-src http://mirrors.aliyun.com/ubuntu/ xenial-security universe
ubuntu 18.04(bionic) 配置如下
deb http://mirrors.aliyun.com/ubuntu/ bionic main restricted universe multiverse
deb-src http://mirrors.aliyun.com/ubuntu/ bionic main restricted universe multiverse

deb http://mirrors.aliyun.com/ubuntu/ bionic-security main restricted universe multiverse
deb-src http://mirrors.aliyun.com/ubuntu/ bionic-security main restricted universe multiverse

deb http://mirrors.aliyun.com/ubuntu/ bionic-updates main restricted universe multiverse
deb-src http://mirrors.aliyun.com/ubuntu/ bionic-updates main restricted universe multiverse

deb http://mirrors.aliyun.com/ubuntu/ bionic-proposed main restricted universe multiverse
deb-src http://mirrors.aliyun.com/ubuntu/ bionic-proposed main restricted universe multiverse

deb http://mirrors.aliyun.com/ubuntu/ bionic-backports main restricted universe multiverse
deb-src http://mirrors.aliyun.com/ubuntu/ bionic-backports main restricted universe multiverse
ubuntu 20.04(focal) 配置如下
deb http://mirrors.aliyun.com/ubuntu/ focal main restricted universe multiverse
deb-src http://mirrors.aliyun.com/ubuntu/ focal main restricted universe multiverse

deb http://mirrors.aliyun.com/ubuntu/ focal-security main restricted universe multiverse
deb-src http://mirrors.aliyun.com/ubuntu/ focal-security main restricted universe multiverse

deb http://mirrors.aliyun.com/ubuntu/ focal-updates main restricted universe multiverse
deb-src http://mirrors.aliyun.com/ubuntu/ focal-updates main restricted universe multiverse

deb http://mirrors.aliyun.com/ubuntu/ focal-proposed main restricted universe multiverse
deb-src http://mirrors.aliyun.com/ubuntu/ focal-proposed main restricted universe multiverse

deb http://mirrors.aliyun.com/ubuntu/ focal-backports main restricted universe multiverse
deb-src http://mirrors.aliyun.com/ubuntu/ focal-backports main restricted universe multiverse
w3m 常用快捷键
- H 显示帮助
- q 退出,会有提示的
- j,k,l,h 移动光标
- J/K 向下/向上滚屏
- T 打开一个新标签页
- Esc-t 打开所有标签页,供你选择,使用jk来上下移动
- U 输入新的网址
- B 后退
- Ctrl+q 关闭当前标签页
Python3.8 yield 表达式不允许在推导式和生成器表达式中使用
yield 表达式(包括 yield 和 yield from 子句)现在不允许在推导式和生成器表达式中使用(但 for 子句最左边的可迭代对象表达式除外)。 (由 Serhiy Storchaka 在 bpo-10544 中贡献。)
https://bugs.python.org/issue10544